Vacuumio I (the Thymio II vacuum cleaner) – Work in Progress

The Project (status 22 February 2015)

also Published on Aseba

The idea of this project is to build a vacuum cleaner ‘module’ for Thymio II.

The challenge is to find or build the proper parts so as it is as simple as possible, and in the idea to challenge everyone interested, to submit and test code that would allow Thymio II to cover a room as fast as possible, making only usage of the integrated sensors and features of Thymio II.

NB : The challenge goes beyond the scope of the initial thoughts that are described, the parts made hereafter need to be changed, the suction system is too poor at this stage, and needs a  replacement (probably based on cyclone separator) as it sucks only very tiny dust, the current system induces turbulence in the dust container (fluid dynamics) and thus not ready for prime time.
I’m working on it and testing but any proposal is welcome 🙂

So for this, let’s start with the ‘making’

The ‘making’

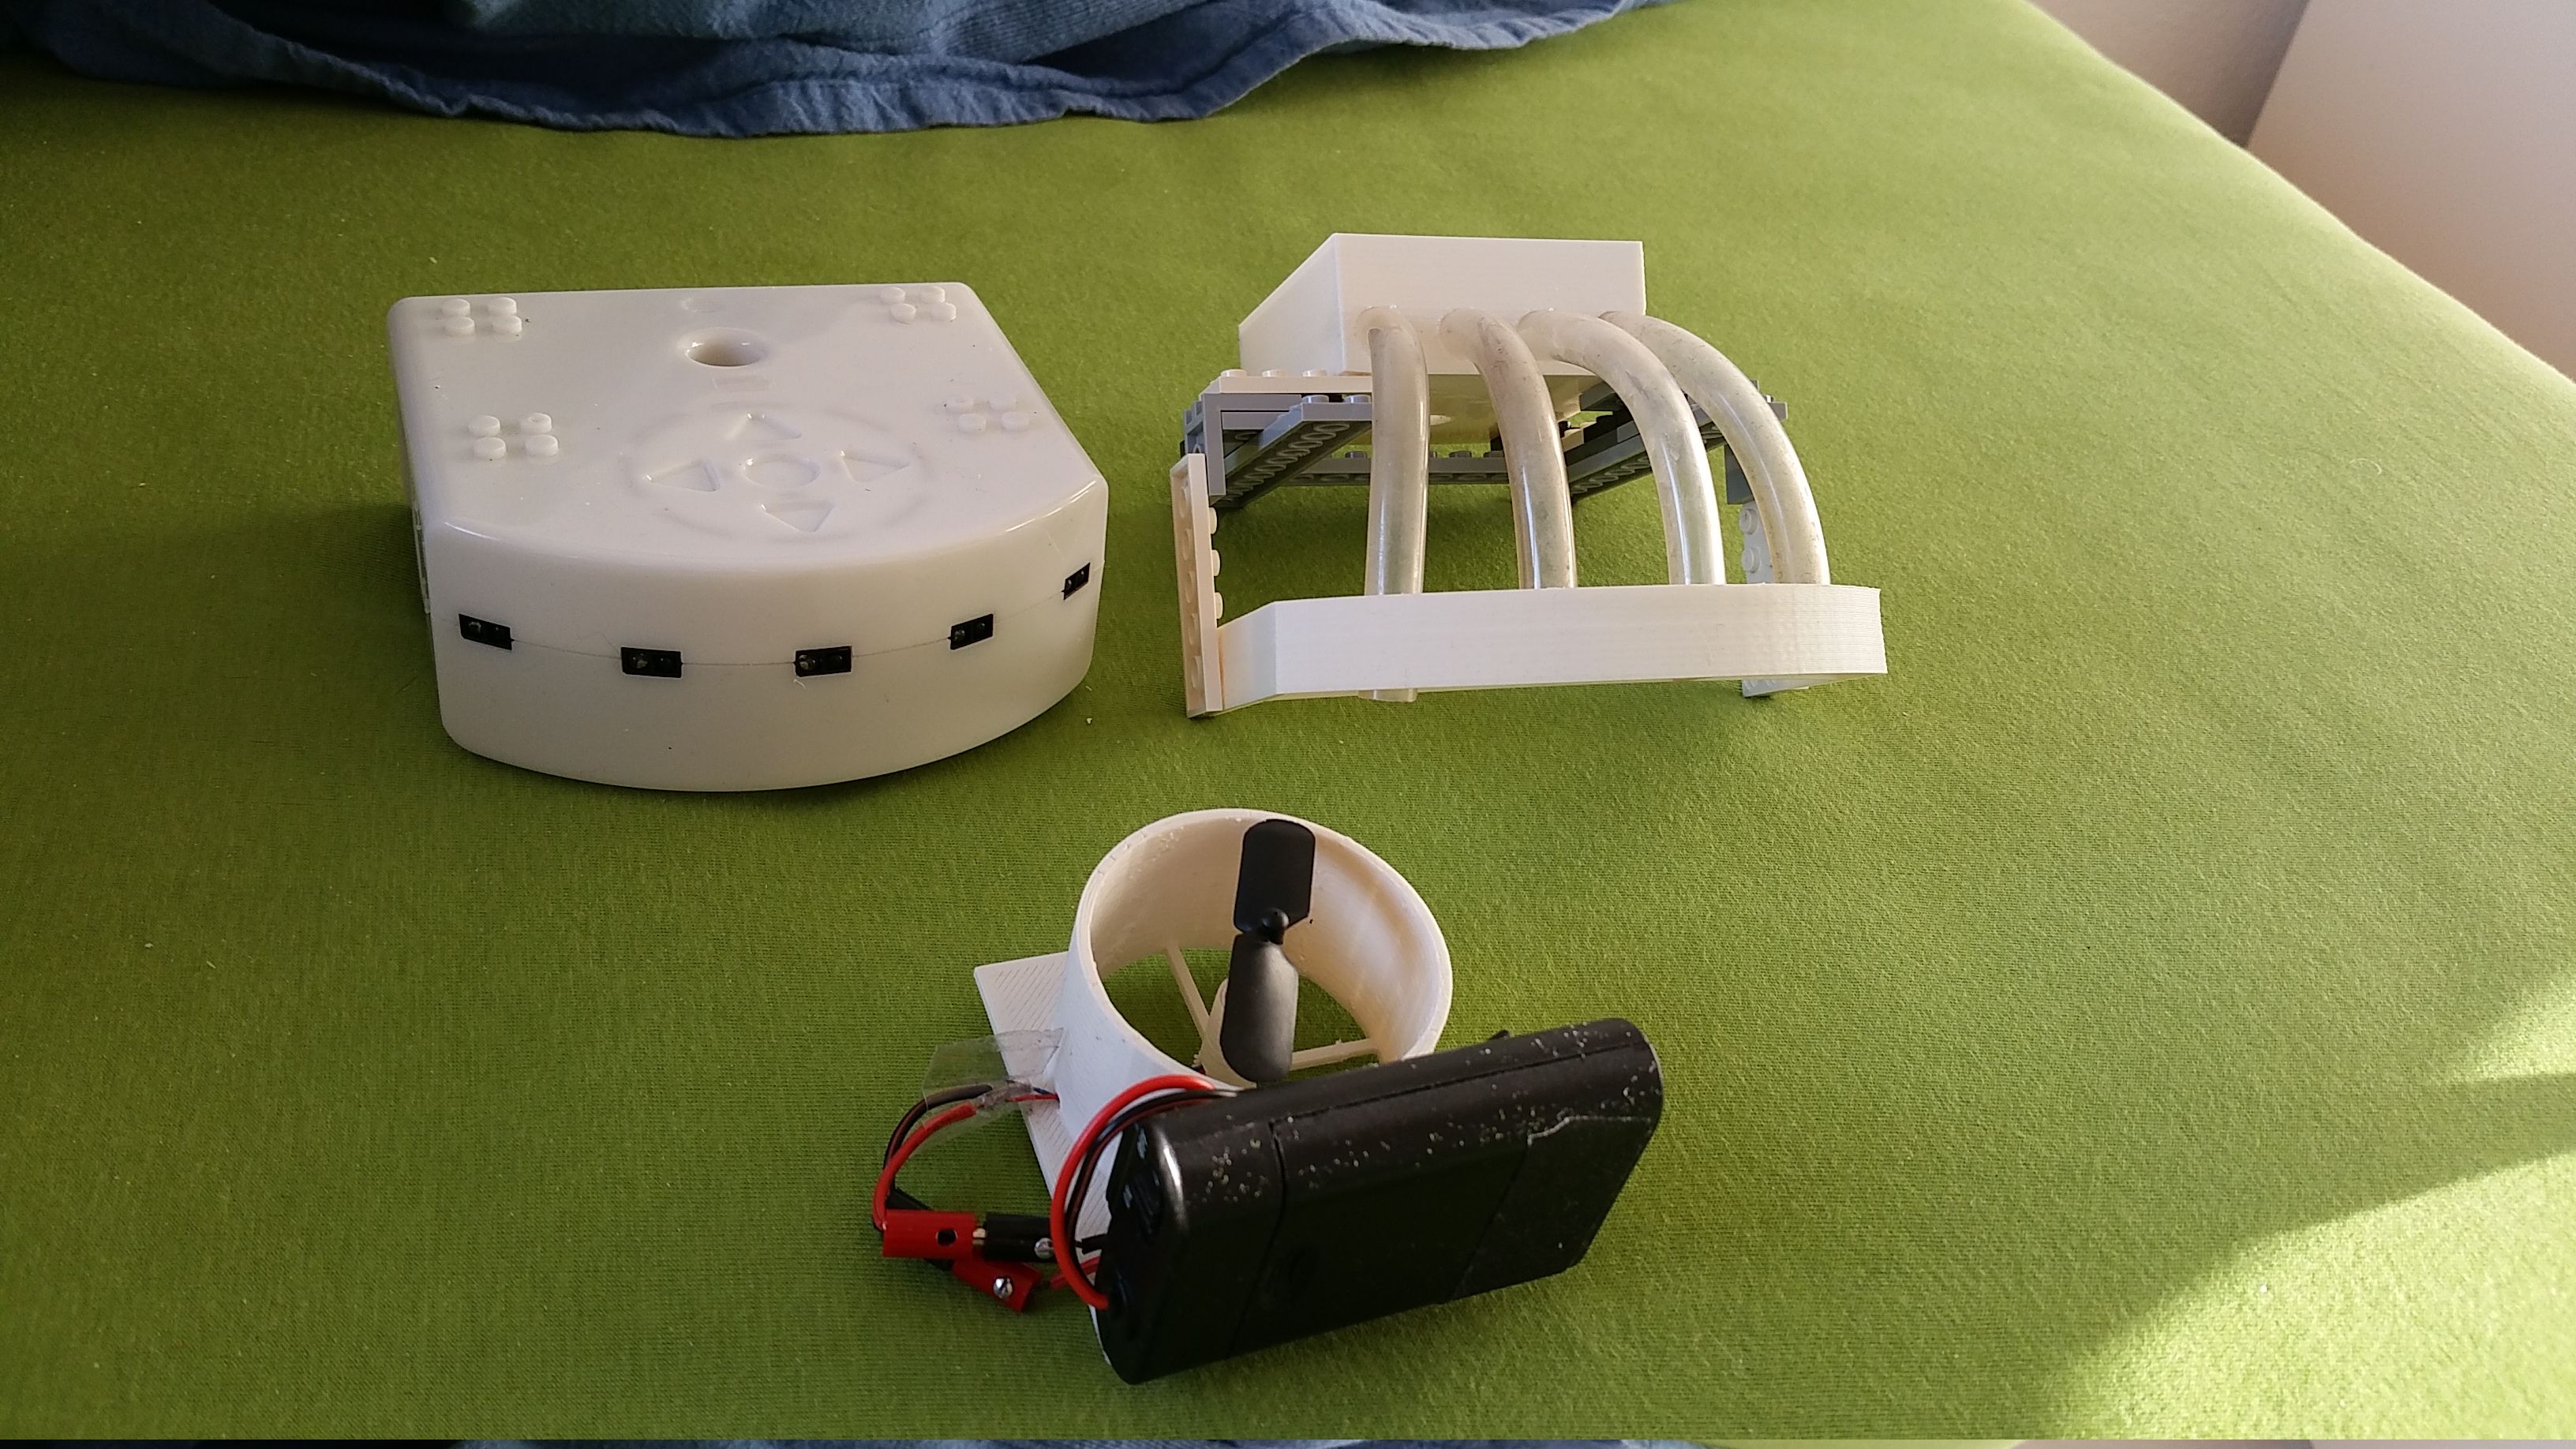
Thymio II has of course the possibility to be extended with Lego parts. As there are some constraints I decided to also use 3D printed parts, as well as, of course, some other parts for aspiration
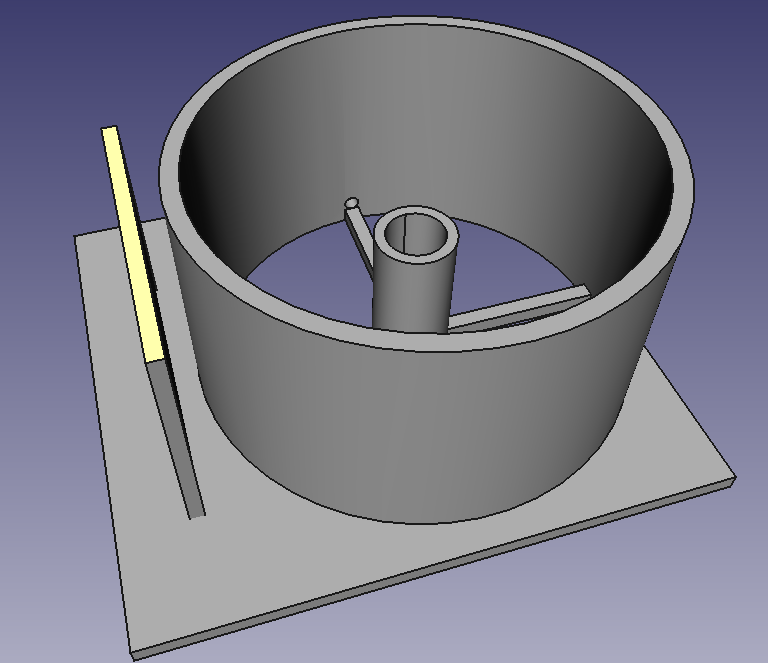
3D printed parts

I designed the 3D printed parts with FreeCAD 014. I used FreeCAD because it is off-line (not a Cloud solution which would need permanent Internet connection), and because I used it before, thus know it a bit, and also because it is multi platform (Windows, OSX, Linux).

The parts where made with the ‘Parts’ module of FreeCAD, only using primitives with fusions and cuts. It’s quick and dirty, and an expert would probably do much better.

I designed 3 parts :

  1. The hose (front aspiration part)
  2. The dust container
  3. The top cover for the dust container, which holds an aspiration system and the batteries. This will depend on the suction system adopted

fv1dust_container1TopCoverTop_cover

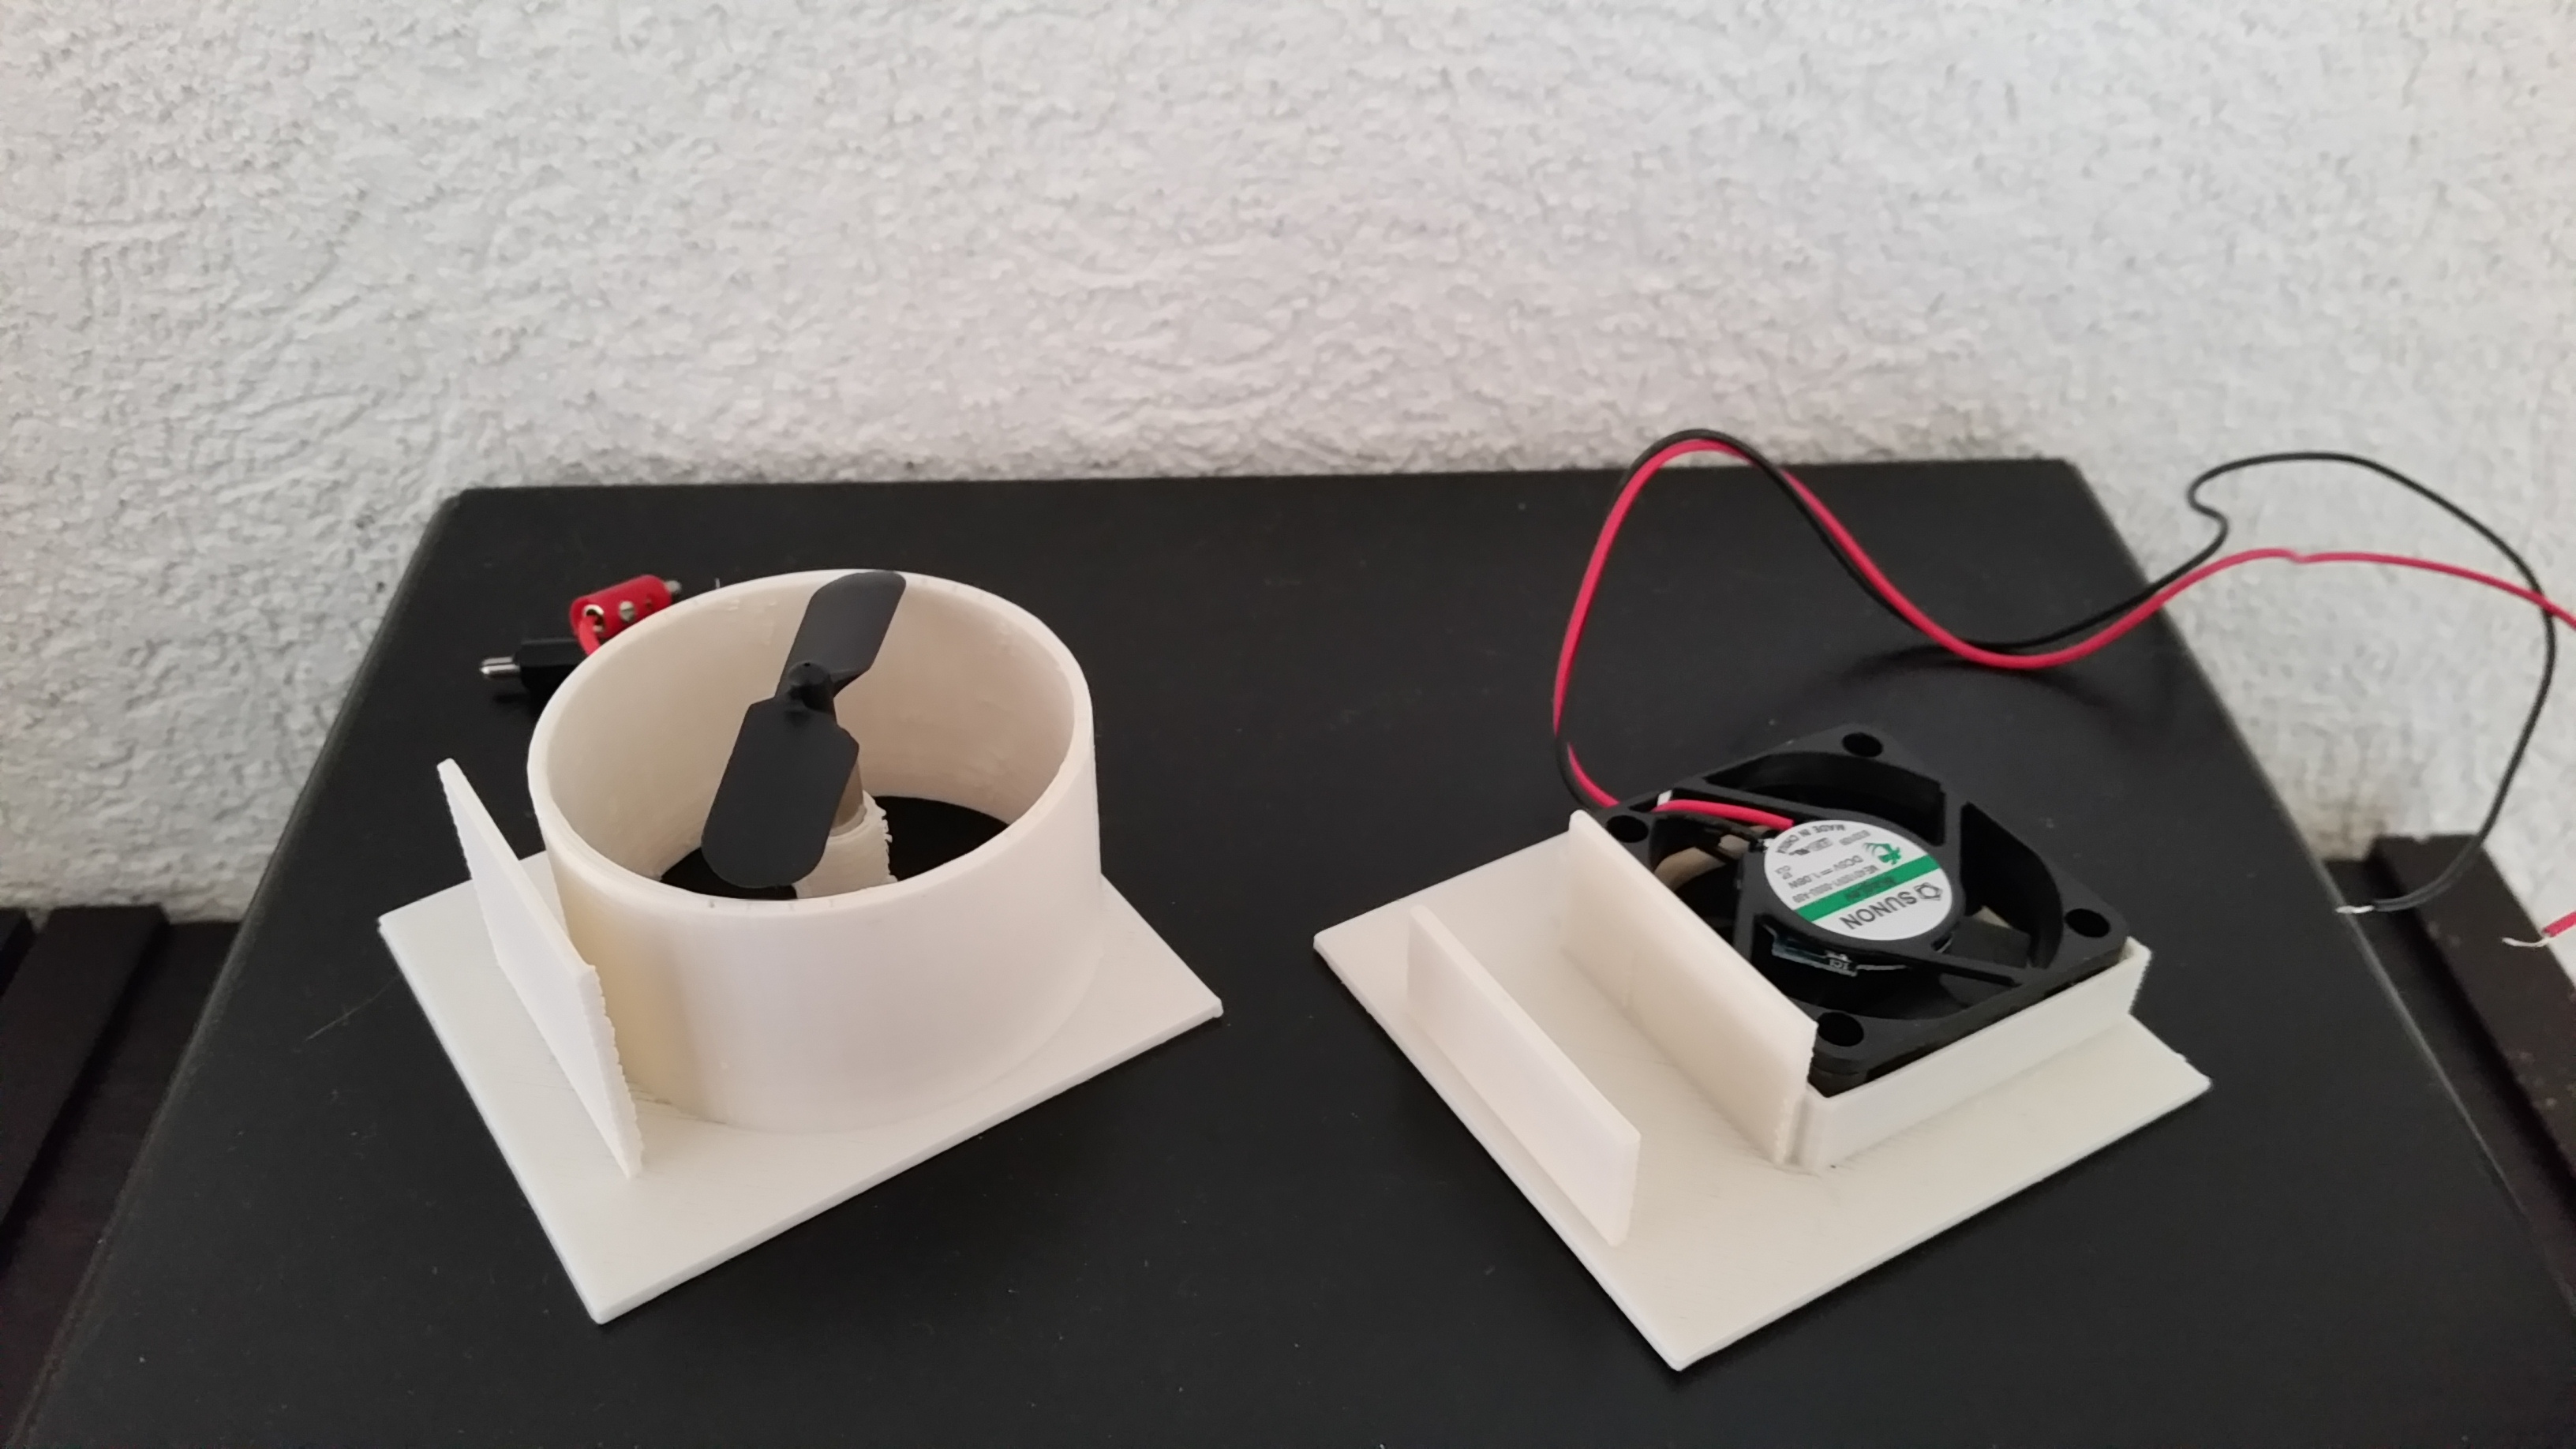
I printed these parts with my Solidoodle 2 3D printer. It’s not the best today but works fine for the purpose. You might have to use a 5mm diameter drill to ‘rework’ the Lego holes, depending on how precise the 3D printer is
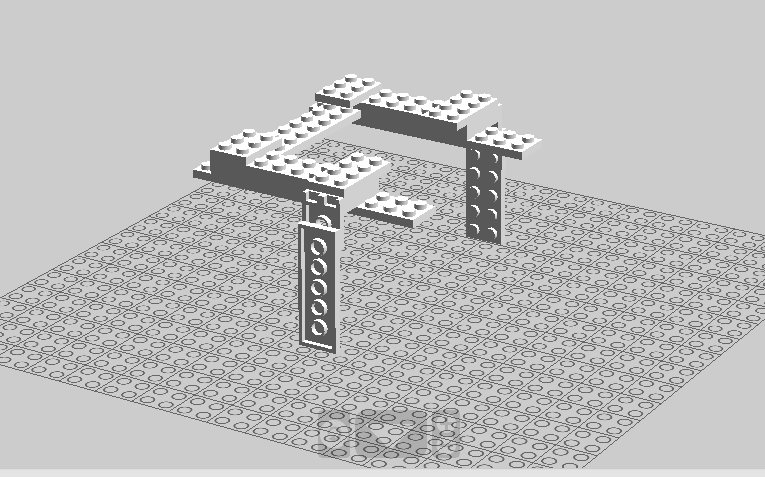
Lego

For the Lego part I tried to make it simple and easy to remove.

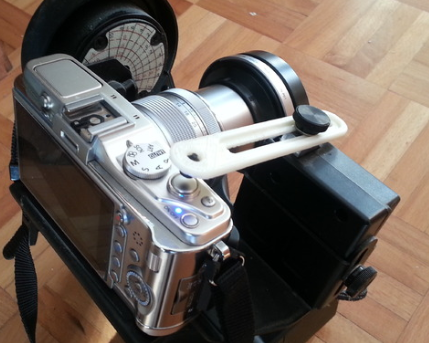
Once assembled with the other parts, the whole vacuum cleaner module can be easily removed from Thymio II as one piece.

I used LDD (Lego Digital Designer) to generate the assembly instructions and list of needed Lego bricks. You can of course use other bricks to have the same result if you don’t have the bricks listed.

armature_LDD

Assembly instruction

Flexible pipe

I used a flexible pipe to ‘connect’ the front aspiration part to the dust container as seen on picture.

This can usually be found in pet shops where you can buy aquariums, I used 4 pipes, 13 cm long and with a diameter of 10 mm

Suction  system (motor)

This is probably the most challenging part. The Suction system is mounted on the top cover of the dust container. It is made by a ventilator/motor/turbin and a battery pack. I tested several ones, but at this time the performance is still poor. Depending on the aspiration surface, type of engine and rotor, as well as the motor power, the results vary a lot, there are unwanted side effects. Furthermore, as adding a filter will even more reduce the suction, I may have to develop a ‘cyclone’ system.

2motorholders

The Code

The code is another big thing. The current tests base on the Thymio II ‘Explorer’ mode (yellow). I will probably base the code on it and adapt it. It will be an interesting challenge to write optimal code so as Vacuumio covers as much as possible of a room as fast as possible.

Future Improvements

  1. Augmenting suction capacity (cyclone separator ?)
  2. Adapted code

Files :

3D Parts
Lego Instructions

First prototype

separate_elementsVacuumio


And here is a first video  :

Thanks for your interest, Alain Tuor

L’impression 3D – BientĂ´t notre quotidien ?

On en parle depuis des annĂ©es, Ă  petite Ă©chelle, et beaucoup d’encre Ă  coulĂ© rĂ©cemment sur le sujet. 2012 a Ă©tĂ© une annĂ©e faste, les annonces se sont succĂ©dĂ©es et les premières imprimantes 3D Ă  moins de CHF 500.- ont vu le jour. Je me suis lancĂ©, vu les prix intĂ©ressants après une longue attente. J’ai tout de mĂŞme dĂ» attendre 3 mois pour obtenir enfin ce ‘jouet’ pour geek. L’excitation Ă©tait Ă  son comble lorsque j’ai enfin reçu ma ‘Solidoodle’. (www.solidoodle.com), une petite imprimante qui peut imprimer des objets de 14cm3, c’est dĂ©jĂ  pas mal. L’imprimante en question est un modèle Ă  extrusion, un filament de plastique (ABS, PLA) est poussĂ© au travert d’une buse prĂ©alablement chauffĂ©e, le filament qui en sort est dĂ©posĂ© par couches successives pour en former un objet fini.


sd


Mais à quoi ça sert ?

Tout d’abord, comme toute nouveautĂ©, on joue avec, on tĂ©lĂ©charge des objets, par exemple sur www.thingiverse.com, il y en a Ă  profusion. Une fois cette phase passĂ©e on se dit, et après ? On commence Ă  rĂ©flĂ©chir Ă  ce qu’on pourrait faire d’utile (encore faut-il dĂ©finir ce qui est utile). Bon ça tombe bien, ça fait 2 ans dĂ©jĂ  que je voulais faire un petit ‘bras’ pour dĂ©clencher des photos pour une tĂŞte motorisĂ©e Gigapan Epic 100 (http://www.gigapan.com/) , celui qui Ă©tait livrĂ© avec Ă©tait trop court pour mon appareil photo, un Olympus Pen, arghh… bref joli petit projet pour commencer.


Alors voilĂ , j’ai pris toutes les mesures du bras existant, dĂ©fini la longueur nĂ©cessaire et… trouvĂ© un programme pour le dessiner en 3D ; lĂ  la difficultĂ© a commencĂ©, apprendre Ă  utiliser un programme de CAO 3D paramĂ©trique, FreeCAD dans mon cas, c’est Open Source (http://free-cad.sourceforge.net/). C’Ă©tait fastidieux, ça m’a pris quelques heures, on dessine des primitives, dĂ©finit les dimensions, fait des extrusions, ‘perce’, etc. et puis finalement une fois qu’on maĂ®trise un peu, un tel objet est fait en 10min. D’autres programmes, bien plus ‘basics’ et simples Ă  utiliser existent (quelques exemples plus bas).

FreeCAD en action
fc

Pour que l’imprimante puisse faire son travail, on exporte en format .stl, (http://en.wikipedia.org/wiki/STL_%28file_format%29), on fait gĂ©nĂ©rer du GCode (http://en.wikipedia.org/wiki/Gcode), celui-ci servant Ă  indiquer Ă  l’imprimante que faire, comme dĂ©placer la tĂŞte, extruder du plastique etc., on le charge dans le programme de l’imprimante, et on appuie sur ‘print’. Le modèle 3D, tĂ©lĂ©chargeable est disponible sous http://www.thingiverse.com/thing:40199, histoire de se donner une idĂ©e.


Le ‘bras’ imprimĂ© en question, montĂ© sur le Gigapan

gp


Et demain ?

Bon, c’Ă©tait une introduction très sommaires sans entrer dans trop de dĂ©tails

En 2013-2014 beaucoup de dĂ©veloppements vont encore se faire et les imprimantes ‘grand publique’ vont se gĂ©nĂ©raliser, plus ‘finies’, plus faciles Ă  mettre en oeuvre et Ă  manipuler ; le plus important pour que le marchĂ© les accepte, c’est le ‘Business Model’, et lĂ , il y a une Ă©bullition en ce moment, certains business models existent, et l’industrie cherche activement les moyens de fabriquer et commercialiser ces imprimantes, les consommables, et bien sĂ»r aussi les modèles 3D, que l’on peut/pourrait vendre sur internet, un peu comme les ‘Markets’ ou ‘Stores’ Ă  la Google ou Apple p.ex., les annonces fracassantes vont arriver, le tout c’est de savoir quand, je vous laisse rĂ©flĂ©chir… On peut imaginer une imprimante connectĂ©e sur Internet, contrĂ´lĂ©e par une App sur Smartphone ou Tablet, on tĂ©lĂ©charge l’objet, lance l’impression, et, de retour Ă  la maison, l’objet est imprimĂ©, angle de fixation, crochet mural, statuette… la seule limite, c’est la crĂ©ativitĂ© et l’imagination… et aussi le type d’imprimante, sa taille, qualitĂ© et rĂ©solution.


Voici quelques sites de plus Ă  explorer, qui ne vont pas manquer de vous aider Ă  cette rĂ©flexion si ce n’est dĂ©jĂ  fait :


Makerbot, un des pionniers des imprimantes 3D ‘pas chères’ – http://www.makerbot.com/

123d Apps de Autodesk – divers outils pour concevoir des objets 3D http://www.123dapp.com/

Sculpteo – Commander des objets 3D en Ligne http://www.sculpteo.com/

Thingiverse – des milliers d’objets 3D Ă  tĂ©lĂ©charger http://www.thingiverse.com/

Cubify de 3DSystems – Imprimantes 3D style grand publique et plus… www.cubify.com

Formlabs – imprimante 3D ‘HiRes’ prometteuse http://formlabs.com/

3DTin http://www.3dtin.com/ et TinkerCAD https://tinkercad.com/ , crĂ©ation d’objets ‘online’

et bien d’autre existent, ça grouille, et ça va continuer, affaire Ă  suivre…