Evaluation – Roomba iRobot Combo J9+

Après trois semaines d’utilisation de mon J9+ Combo, voici une courte évaluation

  • Général:
    – Cartographie initiale plutôt bonne et il navigue plutôt bien
    – ‘Semble’ effectivement s’améliorer sur la durée.
    – Le nettoyage est OK, bien que le lavage des sols est bien moins efficace que celle de mon vieux Braava Jet série 200, certe plus spécialisé pour cette tâche
  • Problèmes – BUGS :
    – Pour l’instant toute tentative de nettoyage d’une zone Individualisée (3 différentes) s’est soldée par un échec, coincé, code erreur 15, rédémarrage nécessaire et , puis lancement manuel par le bouton nécessaire pour le relancer, ce qui lance une découverte, et généralement un nettoyage complet de l’appartement, très frustrant car la fonctionnalité est plus qu’utile, si elle fonctionne
    – A une reprise il est resté coincé dans l’enregistrement de la carte intelligente, le seul moyen de le décoincer a été d’enlever la batterie et la remettre puis le reconnecter au WiFi, le redémarrage n’ayant rien changé, ni même la réinitialisation d’usine, ne reste que l’envoi en réparation… (ceci dit ça ressemble vraiment à un bug logiciel), après recherche sous Reddit et le groupe Facebook, d’autres personnes ont le même souci,
  • A améliorer cruellement :
    – La liste des pièces et zones à nettoyer ne peut pas être triée, notamment alphabétiquement.
    – Pas de possibilité de sélectionner une pièce à nettoyer sur la carte.
    – La carte ‘Ma Maison’ n’est pas zoomable ce qui empêche de voir certaines petites pièces qui sont cachées par le nom.
    – Les résumés de nettoyage sont très minimalistes, pas de détails, pas moyen de savoir quel programme de nettoyage a été utilisé ou de revoir les obstacles rencontrés.
    – Les cartes ne montrent pas clairement le chemin pris par le robot ce qui empêche de savoir s’il évolue vraiment dans le temps.
    – Les messages en cas de blocage ne sont pas parlants, les codes d’erreur, par exemple, 15 ne sont pas affichés dans l’historique.
    – Les zones individualisées ne peuvent être que rectangulaires.
    – La carte de l’appartement ne peut pas être éditées et le réglage des délimitations est compliqué et très limité, difficile de faire des rotation des délimitations
    – Changement de langue intempestif, pas abouti cette App…
    – Se perd en cours de route, revient à la base, puis repart pour nettoyer
    – Se bloque à cause d’un obstacle dans une pièce, alors qu’il ne devait pas s’y rendre… IA = Idiotie Artificielle ?
    – Malgré plusieurs nettoyages de la même pièce, il en rate toujours un bout (?)

Evaluation reMarkable 2

reMarkable 2

Première revue – 7 avril 2024

Globalement un bon produit, mais je suis un peu partagé, voire un peu déçu; pour ce niveau de prix l’expérience utilisateur devrait être meilleure selon moi, j’espère qu’il y aura des améliorations prochainement, et qu’ils feront mieux avec le 3

Commentaires/Evaluations

Positif

+ Très fin et léger
+ Ecriture fluide
+ Bonnes options d’écriture (types de crayons/stylos etc)
+ L’envoi par mail en plusieurs formats au choix est fonctionnel
+ La charge semble bien tenir

A améliorer

– Actions touch assez peu réactif, déplacer un bloc n’est pas fluide du tout, fermeture d’un document, sélection d’outils etc. manque de réactivité
– Prix très élevé
– Intégration Google Drive bancale, mauvaise expérience; ne permet pas de définir un dossier par défaut vers lequel envoyer les notes, export uniquement en PDF… et pour avoir un accès illimité à cette fonctionalité bancale il faut payer ? Il faudrait améliorer cela avant d’en faire un business…
– L’export de plusieurs fichier simultanément en SVG n’est pas possible dans l’App PC, incompréhensible
– Pas possible d’envoyer 2 fichiers en même temps depuis la tablette, l’option ‘Send’ disparaît lorsqu’on sélectionne plusieurs fichiers
– Fonction Export de la tablette pas claire, parfois il propose l’esport vers ‘MyFiles’, parfois vers le cloud … (un truc que je n’ai pas compris?)
– Les Apps (PC/Android) ne semble pas amener grand chose

En bref pour un prix aussi élevé j’espérait mieux de cette solution, assez limitée, produit trop ‘fermé’ selon moi, il aurait fallu investir plus dans le produit et les fonctionalités et moins dans le marketing (qui fait un peu croire à un produit parfait…)
J’espère pouvoir réviser certaines opinions lors de prochaines mises à jour du produit…

Evaluation Aktiia App sur Google play

Aktiia App 1.14.0

Apairage du bracelet sans problème
Apairage du brassard est restée figé, après un certain temps j’ai fini par forcer la fermeture de l’app et après redémarrage tout OK (bacelet FW 1.8, brassard FW 1.6)

App très claire et simple, en bref fait bien le job, mesures régulières (sauf bien sûr durant plages très actives comme on doit être tranquille pour prendre une tension)

Commentaire/suggestions

  • Il faut parfois forcer la fermeture de l’app et la réouvrir pour que la connexion se fasse à nouveau
  • La fermeture/boucle du bracelet pourrait être améliorée (un peu plus d’espace entre les bords de la boucle et le bracelet) pour simplifier la fixation, (comme on doit l’enlever au moins une fois par jour pour la douche)
  • Une prise de tension manuelle pour référence contextuelle pourrait avoir une vraie valeur ajoutée, hors statistiques, juste pour une évaluation complémentaire, avec possibilité d’y assigner une note (p.ex. stress, sport, café, etc.). Ceci dit une prise manuelle avec le brassard est possible
  • Il manque clairement la possibilité d’exporter les mesures dans un format exploitable pour analyse plus détaillée (cvs pour analyse Excel p.ex.)

Magasin Classidur Jallut – Yverdon

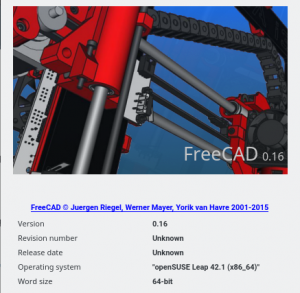
Installation (compilation) of FreeCAD 016 on OpenSUSE Leap 42.1

Update on the series, now FreeCAD 016 is out, time to compile it on OpenSuse Leap 42.1. Few change, I had to add a repository to have a minimum version 1.55 for boost-devel. The dependencies needed are here.

So let’s go again, to the command line, this is what I did :

Let’s add sources for dependencies :

‘Trust’ sources when asked for

cd
sudo zypper addrepo http://download.opensuse.org/repositories/devel:/languages:/python/openSUSE_Leap_42.1/ PythonDev
sudo zypper addrepo http://download.opensuse.org/repositories/games/openSUSE_Leap_42.1/ Games
sudo zypper addrepo http://download.opensuse.org/repositories/KDE:/Extra/openSUSE_Leap_42.1/ KDE:Extra
sudo zypper addrepo http://download.opensuse.org/repositories/devel:/libraries:/c_c++/openSUSE_Leap_42.1/ C++_Libraries

Refresh repositories

sudo zypper refresh

And launch installation of dependencies

Accept installation of packages when asked to

sudo zypper install  gcc cmake OpenCASCADE-devel libXerces-c-devel python-devel libqt4-devel libshiboken-devel python-pyside-devel python-pyside-tools Coin-devel SoQt-devel boost-devel libode-devel  libQtWebKit-devel libeigen3-devel gcc-fortran freetype2 freetype2-devel

Hopefully it also works fine for you, and now let’s fetch the source code file (archive ) here: https://sourceforge.net/projects/free-cad/files/FreeCAD%20Source/FreeCAD-0.16.6703.tar.gz/download

Extract its content and enter its directory:

tar -zxvf freeCAD..... (name of file)
cd freeCAD..... (name of directory where it has been extracted to)

And launch compilation (This took some time even on a good NB with SSD, 20GB RAM and a Quad Core CPU, it only uses 1 core, no more than 4GB RAM and little HDD writes. You can follow the progress in %

cmake .
make

And now you can launch FreeCAD (if all went fine)


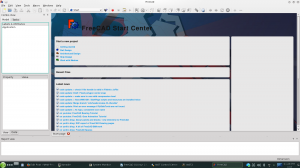
./bin/FreeCAD

Screenshot_20160515_110338

Have Fun and check out the Website http://www.freecadweb.org/


Installation (compilation) of FreeCAD 015 on OpenSUSE Leap 42.1

Yet another update, this time it is FreeCAD 015 installation on OpenSuse Leap 42.1. Last post was 015 on 13.2.  – There are not many changes really, merely the repositories. Unfortunately, FreeCAD is not in the official OpenSUSE repositories and the packages I found didn’t work for me :-/

As said in past posts, FreeCAD is a very good Open Source 3D CAD program, I use it sometimes to make 3D objects I print, and sometimes post on Thingiverse, and as far as I could see, the package ready for OpenSUSE has some issues, so I decided to compile myself, based on information I found here and there (i.e. http://www.freecadweb.org /wiki/index.php?title=CompileOnUnix) and by trying out, looking at results and error messages. As said before it may not be complete or perfect, but that worked for me on a fresh OpenSUSE Leap 42.1 install


So let’s go again, to the command line, this is what I did :

Let’s add sources for dependencies (that is quick) :

‘Trust’ sources when asked for

cd
sudo zypper addrepo http://download.opensuse.org/repositories/devel:/languages:/python/openSUSE_Leap_42.1/ PythonDev
sudo zypper addrepo http://download.opensuse.org/repositories/games/openSUSE_Leap_42.1/ Games
sudo zypper addrepo http://download.opensuse.org/repositories/KDE:/Extra/openSUSE_Leap_42.1/ KDE:Extra

Refresh repositories  (that takes a bit longer)

sudo zypper refresh

And launch installation of dependencies (that is longer)

Accept installation of packages when asked to

sudo zypper install gcc cmake OpenCASCADE-devel libXerces-c-devel python-devel libqt4-devel python-qt4 Coin-devel SoQt-devel boost-devel libode-devel libQtWebKit-devel libeigen3-devel gcc-fortran freetype 2 freetype2-devel libshiboken-devel python-pyside-devel libspnav-devel swig python-pyside-tools doxygen python-matplotlib

Here I got an ‘error’ message about a package that will be deprectated, but it seems to have no impact

Hopefully it also works fine for you, and now let’s fetch the source code file (archive ) here: http://downloads.sourceforge.net/project/free-cad/FreeCAD%20Source/freecad_0.15.4671.tar.gz

Extract its content and enter its directory:

tar -zxvf freeCAD..... (name of file)
cd freeCAD..... (name of directory where it has been extracted to)

And launch compilation (This took some time even on a good NB, but you can follow the progress in %)

cmake .
make

And now you can launch FreeCAD (if all went fine)


./bin/FreeCAD
snapshot1


And check out the Website http://www.freecadweb.org/


Installation (compilation) of FreeCAD 015 on OpenSUSE 13.2

This is an update of my article about installing version 014 on OpenSUSE 13.2 – Now it’s 015’s turn to be compiled on OpenSuse 13.2 – There are some minor changes compared to previous versions.

As said in last post, FreeCAD is a very good Open Source 3D CAD program, I use it sometimes to make 3D objects I print, and sometimes post on Thingiverse, and as far as I could see, the package ready for OpenSUSE has some issues, so I decided to compile myself, based on information I found here and there (i.e. http://www.freecadweb.org /wiki/index.php?title=CompileOnUnix) and by trying out, looking at results and error messages. It may not be complete or perfect, but that worked for me on a fresh OpenSUSE 13.2 install


So let’s go again, to the command line, this is what I did :

Let’s add sources for dependencies (that is quick) :

‘Trust’ sources when asked for

cd
sudo zypper addrepo http://download.opensuse.org/repositories/devel:/languages:/python/openSUSE_13.2/ PythonDev
sudo zypper addrepo http://download.opensuse.org/repositories/games/openSUSE_13.2/ Games
sudo zypper addrepo http://download.opensuse.org/repositories/KDE:/Extra/openSUSE_13.2/ KDE:Extra

Refresh repositories  (that takes a bit longer)

sudo zypper refresh

And launch installation of dependencies (that is longer)

Accept installation of packages when asked to

sudo zypper install gcc cmake OpenCASCADE-devel libXerces-c-devel python-devel libqt4-devel python-qt4 Coin-devel SoQt-devel boost-devel libode-devel libQtWebKit-devel libeigen3-devel gcc-fortran freetype 2 freetype2-devel libshiboken-devel python-pyside-devel libspnav-devel swig python-pyside-tools doxygen python-matplotlib

Hopefully it also works fine for you, and now let’s fetch the source code file (archive ) here: http://downloads.sourceforge.net/project/free-cad/FreeCAD%20Source/freecad_0.15.4671.tar.gz

Extract its content and enter its directory:

tar -zxvf freeCAD..... (name of file)
cd freeCAD..... (name of directory where it has been extracted to)

And launch compilation (This took some time even on a good NB, but you can follow the progress in %)

cmake .
make

And now you can launch FreeCAD (if all went fine)


./bin/FreeCAD
snapshot1


And check out the Website http://www.freecadweb.org/


Vacuumio I (the Thymio II vacuum cleaner) – Work in Progress

The Project (status 22 February 2015)

also Published on Aseba

The idea of this project is to build a vacuum cleaner ‘module’ for Thymio II.

The challenge is to find or build the proper parts so as it is as simple as possible, and in the idea to challenge everyone interested, to submit and test code that would allow Thymio II to cover a room as fast as possible, making only usage of the integrated sensors and features of Thymio II.

NB : The challenge goes beyond the scope of the initial thoughts that are described, the parts made hereafter need to be changed, the suction system is too poor at this stage, and needs a  replacement (probably based on cyclone separator) as it sucks only very tiny dust, the current system induces turbulence in the dust container (fluid dynamics) and thus not ready for prime time.
I’m working on it and testing but any proposal is welcome 🙂

So for this, let’s start with the ‘making’

The ‘making’

Thymio II has of course the possibility to be extended with Lego parts. As there are some constraints I decided to also use 3D printed parts, as well as, of course, some other parts for aspiration

3D printed parts

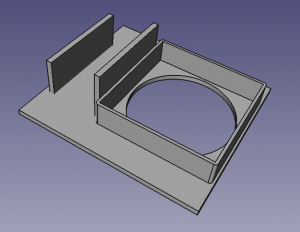
I designed the 3D printed parts with FreeCAD 014. I used FreeCAD because it is off-line (not a Cloud solution which would need permanent Internet connection), and because I used it before, thus know it a bit, and also because it is multi platform (Windows, OSX, Linux).

The parts where made with the ‘Parts’ module of FreeCAD, only using primitives with fusions and cuts. It’s quick and dirty, and an expert would probably do much better.

I designed 3 parts :

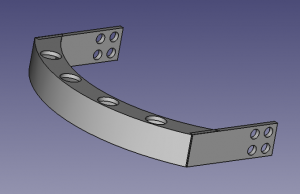
  1. The hose (front aspiration part)
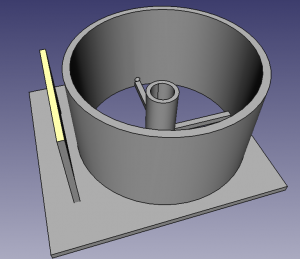
  2. The dust container
  3. The top cover for the dust container, which holds an aspiration system and the batteries. This will depend on the suction system adopted

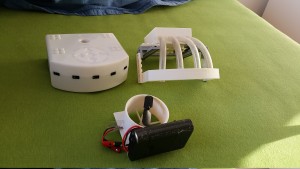
fv1dust_container1TopCoverTop_cover

I printed these parts with my Solidoodle 2 3D printer. It’s not the best today but works fine for the purpose. You might have to use a 5mm diameter drill to ‘rework’ the Lego holes, depending on how precise the 3D printer is

Lego

For the Lego part I tried to make it simple and easy to remove.

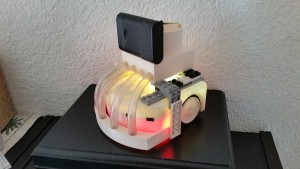
Once assembled with the other parts, the whole vacuum cleaner module can be easily removed from Thymio II as one piece.

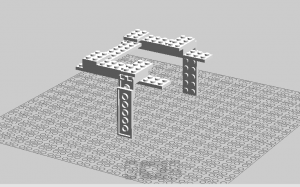
I used LDD (Lego Digital Designer) to generate the assembly instructions and list of needed Lego bricks. You can of course use other bricks to have the same result if you don’t have the bricks listed.

armature_LDD

Assembly instruction

Flexible pipe

I used a flexible pipe to ‘connect’ the front aspiration part to the dust container as seen on picture.

This can usually be found in pet shops where you can buy aquariums, I used 4 pipes, 13 cm long and with a diameter of 10 mm

Suction  system (motor)

This is probably the most challenging part. The Suction system is mounted on the top cover of the dust container. It is made by a ventilator/motor/turbin and a battery pack. I tested several ones, but at this time the performance is still poor. Depending on the aspiration surface, type of engine and rotor, as well as the motor power, the results vary a lot, there are unwanted side effects. Furthermore, as adding a filter will even more reduce the suction, I may have to develop a ‘cyclone’ system.

2motorholders

The Code

The code is another big thing. The current tests base on the Thymio II ‘Explorer’ mode (yellow). I will probably base the code on it and adapt it. It will be an interesting challenge to write optimal code so as Vacuumio covers as much as possible of a room as fast as possible.

Future Improvements

  1. Augmenting suction capacity (cyclone separator ?)
  2. Adapted code

Files :

3D Parts
Lego Instructions

First prototype

separate_elementsVacuumio


And here is a first video  :

Thanks for your interest, Alain Tuor

Packard Bell oneTwo AiO M3870 disassembly

This is a quick visual guide on how to open this all in on computer. I spent some time fiddling aroud to find the scres and clips. I hope this will help those who want to give a new life to this computer by adding (changin) RAP or replacing the slow 5400 RPM Hard Drive by a faster SSD on SSHD

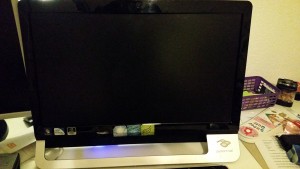
So here is what the model looks like

Front
Front

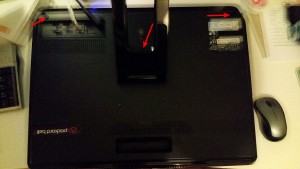
Back (sorry for the fuzzy image)

There are 9 screws to remove to open it, 2 are visible, the next 3 under the cache situated under the stand
Back

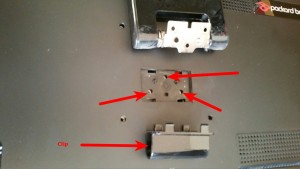
One the cache removed you can access the 3 next screws and remove the stand
media-20141224

You now need to remove the cache on the DVD drive by simply but gently pulling it, you can then access the next 2 screws
media-20141226

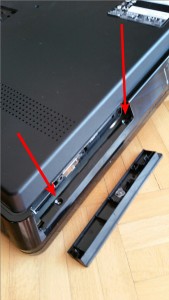
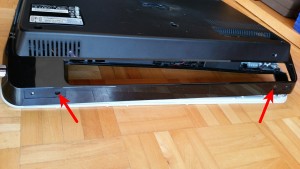
Al last, remove the rubber parts at the bottom of the screen, and you can access the last 2 screws to open it
media-20141225

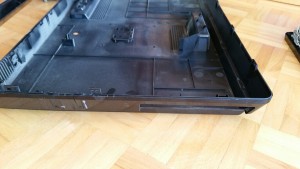
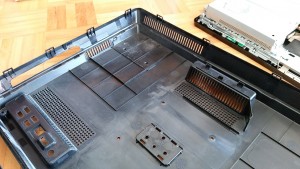
Here is a visual so as you can see where the clips are, this was not simple to find but you must unclip it with, ie a screw driver or so

media-20141222 media-20141223

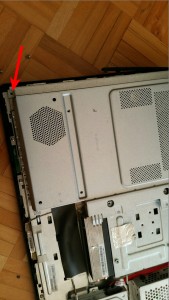
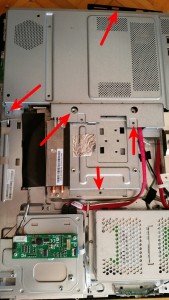
Inside of it you can access the hard drive directly by removing 1 screw, or the memory by removing several more screws (not all shown by arrow) and take off the main plate
media-20141221media-20141220

This is not very precise but I hope it can help; as I didn’t find any instruction or manual on the web I wanted to share at least some info.